Rich’s Portable Cabins
I connected with a tiny house builder from Oregon this past week. Rich builds some very nice portable cabins in both trailerable and park model size; but our conversation began with the news that he’s building a tiny house community in North Powder, Oregon designed for the type of homes he builds.
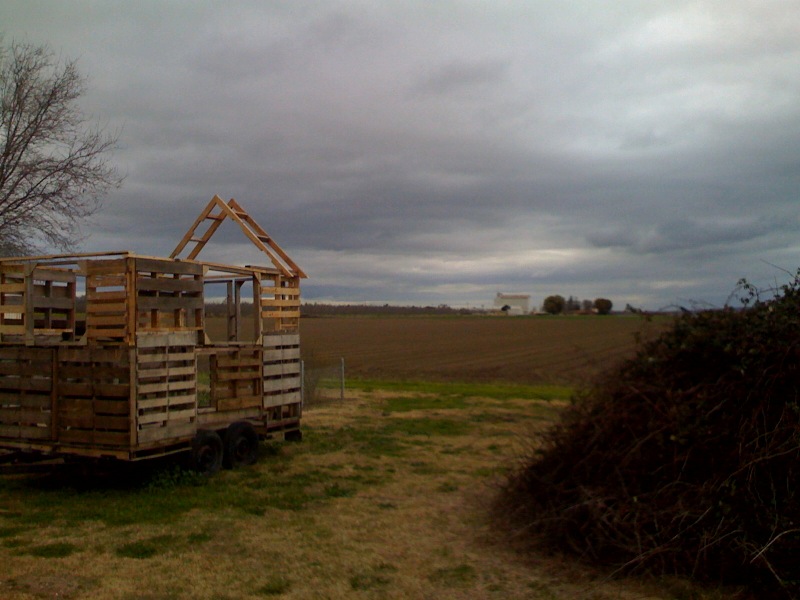
My understanding is that the community will be setup like a mobile home park, including the necessary utilities. The site is a former lumber mill that Rich has been carefully bringing back to life. It should have enough space for 100 homes. Below is a photo of the site, which is actually a very large panoramic photo… just click it to zoom in.![]()

To learn more about these homes and this community project connect with Rich through his website at www.richsportablecabins.com.

The following is a guest post written by Rich.
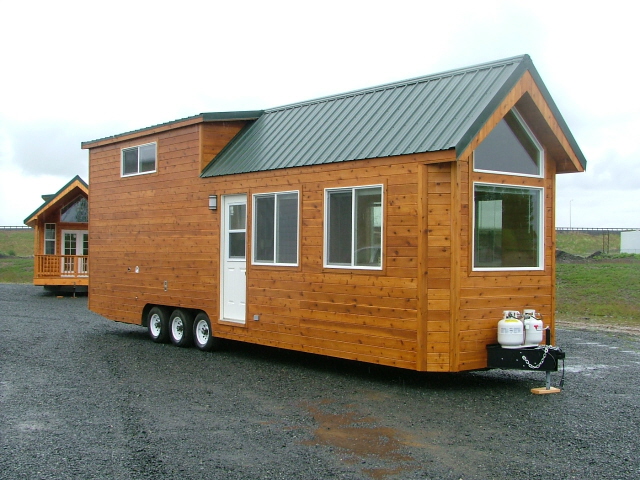
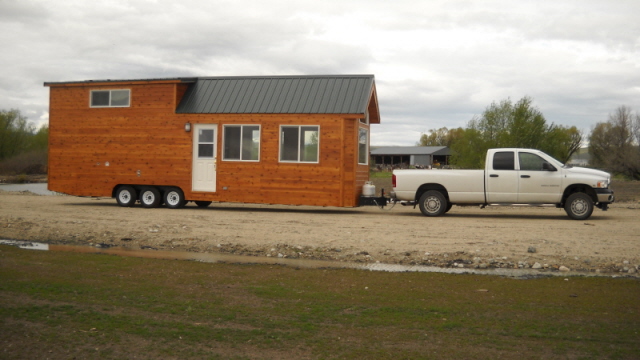
I’ve always enjoyed figuring out ways to beat the system. Now I’m not complaining about how life has treated me over the years, but know in my heart there are other ways that might be better, more fitting to an individuals needs or desire when it comes to living space. A big house with lots of rooms might be cool for a while, but as we all know the rooms tend to fill up with stuff, as nature and houses both abhor a vacuum. So small is good right? Now, I admit this “8 wide stand up loft cabin” isn’t as small as many of you tiny housers go, but hey, I’ve got stuff too! The cabin is LARGE when concerning the rig that can pull it. Tipping the scales at 13,200 lb. it is on the verge of being too heavy to pull with a 3/4 ton truck, and though I have, a one ton would be better. I will say though it has exceptional balance and tongue weight, so if you go slow and there is only a light wind it can be moved safely. By the way I didn’t design it to be pulled any great distance, except occasionally and with a larger rig, and so the weight wasn’t going to be a issue as long as it didn’t become too heavy. Enough said about the weight! On to more important things like how is it built, and will I be warm in the winter, and how much is it?
Built as a show cabin and for the occasional trip down to the river for a weekend, the cabin sports a lot of great features and innovations. Let me walk you through it.
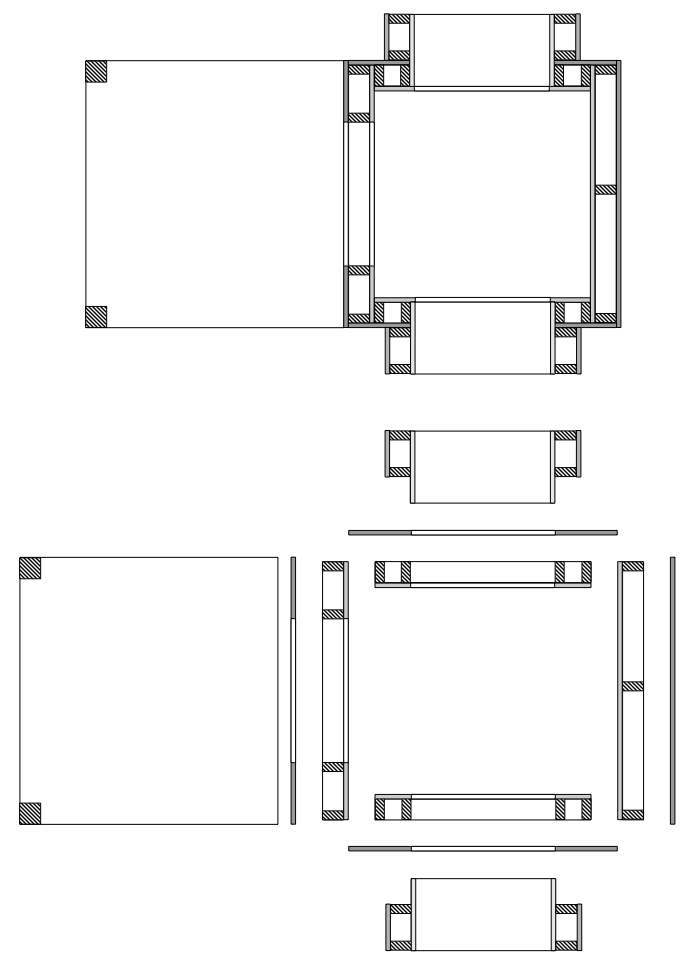
Built with conventional building materials, the cabin presents itself as the look that RPC- Rich’s Portable Cabins, has become know for. Combined with what I call the “underslung floor system”- my unique approach to solving the height issues encountered when building functional loft cabins- and the steepness of the roof, the cabin height is well under 14′ and will go most places without a problem. Be aware that the cabin is a low rider, a street rod of sorts, and may drag on the rare tall speed bump.
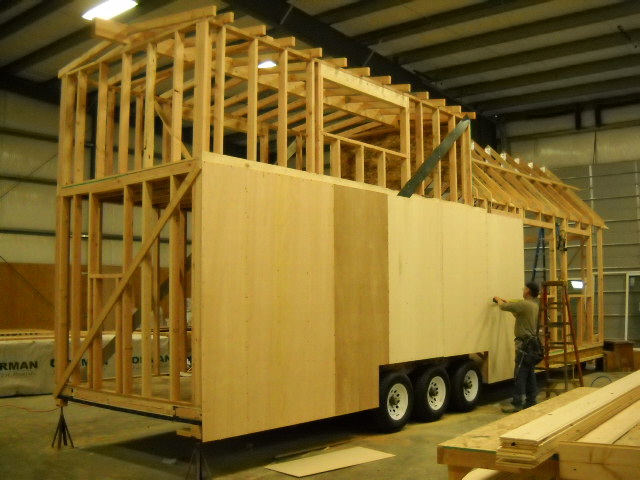
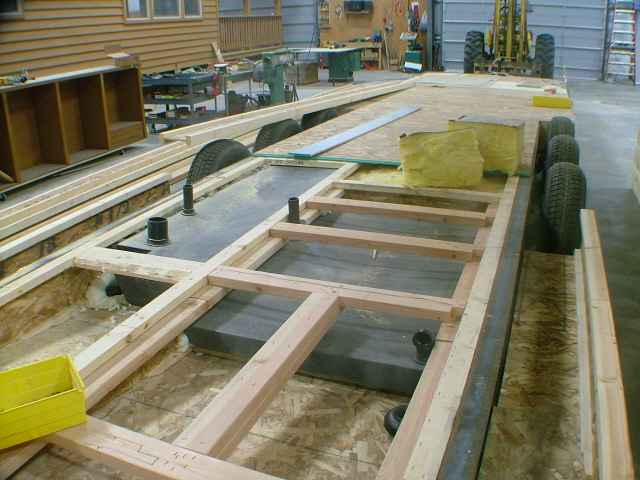
The under side is protected from the critters with heavy sheet metal adhered to some osb, and offers protection from the elements too. Insulation in the floor cavity is 10″ thick and has an R value of 38. I guarantee there is no cabin anywhere that has more insulation than that in the floor. R13 in the walls and R30 or so in the vaulted ceiling. Loft has less because of the rafters, but still I don’t think it will be a problem to heat it when it is 10 below outside. The steel frame and axles contribute significant weight to the cabin and I could have used smaller steel, but it’s what I had on hand at the time.
The framing is always fun and relatively easy, but one needs to pay attention to framing and design details so everything fits, and we all know there is hardly anything worse that going backwards! One thing to remember when building larger cabins is that steel bends, so be sure to consider how the steel beams will react to weight. Sorry, the only way to know how much camber and where to put it in the frame is by experience only. Camber is applied by using a large stick welder at about 300 amps.
Next is bracing and sub skin. To keep the cabin walls straight requires straps, sheathing or a combination of both. If there is one thing I’ve taught my crew its this: Stand back and look at what you’re doing on occasion, line up the lines and develop a good eye for verification that all is well. It’s easy to nail a stud on the wrong side of the layout line, and if a fellow can catch it right away, it’s so much easier rather that having the boss catch it!
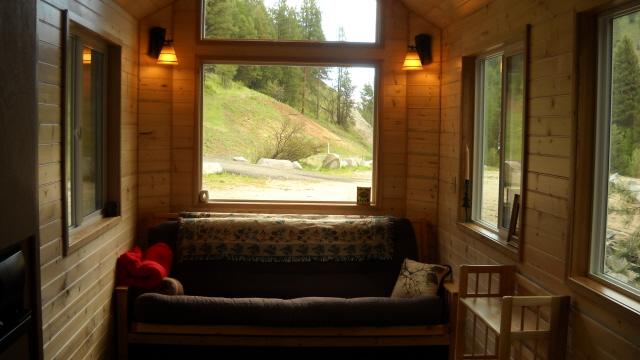
Pine interior is a pleasure to work with, but pay attention to loose knots and bad color. We always put two coats of water based lacquer on the interior to give it added protection and shine. It will make the walls easier to clean and won’t hold the dust as readily. The wood is 3/4″ thick and though heavier than 1/4″ paneling, it is far superior. Put a nail anywhere to hang your pictures. A word of caution: don’t drive the nail more than an inch deep, because you never can tell where a wire might be, and a nail could short out the wires.
Speaking of wires, this cabin is fully wired to NEC and has numerous outlets. Plenty for all the electronics and other stuff. It also has an inverter and batteries for when you need to be off grid, and even has a solar panel on the roof for gentle charging of the batteries. If you need to run a generator to power the cabin its easy to plug it in, and with the built in charger on the inverter, the batteries will be charged at the same time.
The bathroom is large due to the design, but firmly believe there is nothing wrong with a bathroom big enough to dry yourself off in without hitting your knuckles on the wall. The shower is huge at 36″, and has a glass shower door. The toilet is a low flush RV type toilet, and dumps into a 32 gallon black water holding tank. The shower, washer/dryer and the kitchen sink drain into a gray water holding tank, also 30+ gallons in size. The cabin has a 40 gallon fresh water tank and a 12 volt pump system for when you’re off grid. The hot water is provided with an on-demand water heater so you never run out of hot water.
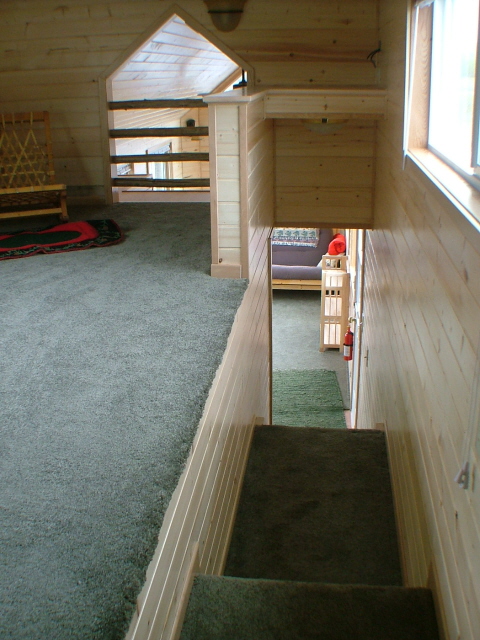
The stand up loft feature is an element I’m very proud of. I developed the concept and lead the industry with this feature and because of the design, it can accommodate a person who is well over 6′ in the loft trough. There is lots of storage beneath the trough floor, and even has a stand up utility room beneath the stairs for the systems.
Appliances are: medium sized propane fridge with freezer, 40,000 Btu propane forced air furnace, propane range, microhood, Eurotech washer/dryer, Rinnai tankless water heater, small ac in the loft. Has custom lighting as well plus a ceiling fan.
The exterior siding is tongue and groove cedar with two coats of oil based stain, and since the cabin is house wrapped, there should be no issues with moisture or water damage to the structure. The roof is metal and is screwed into Doug fir 1×4. The fir wood really holds the screws well, and won’t back out after a few years in the sun and winters. Windows are of the typical vinyl variety, but have low E for extra insulation value.
The cabinets are assembled and installed, interior walls installed, flooring goes in and finally on to the trim. And if you are like all the rest of us, by the time you get to the finishing touches, you’re ready for this grand adventure to be done. Let’s get on with the next cabin shall we?
There are a lot of steps in between that I didn’t mention, and if you decide to give cabin building a try, be prepared to spend hundreds of hours for a cabin of this nature. Or have me build it for you. The price on this cabin is $42,000


Some odd design choices, using OSB in the floor, more insulation in the floor than the ceiling but all in all it’s just a soul-less large house on wheels or a tiny house which got bigger but not better.
“there should be no issues with moisture or water damage to the structure” – as long as people keep building houses without proper eaves, water/sun damage will be your friend. Nature always wins.
I think this is really great. The video doesn’t play, can I see the video elsewhere? This is so great for a mother in law apartment on a property or any sort of vacation cabin.
I’m sorry for your sorrow.
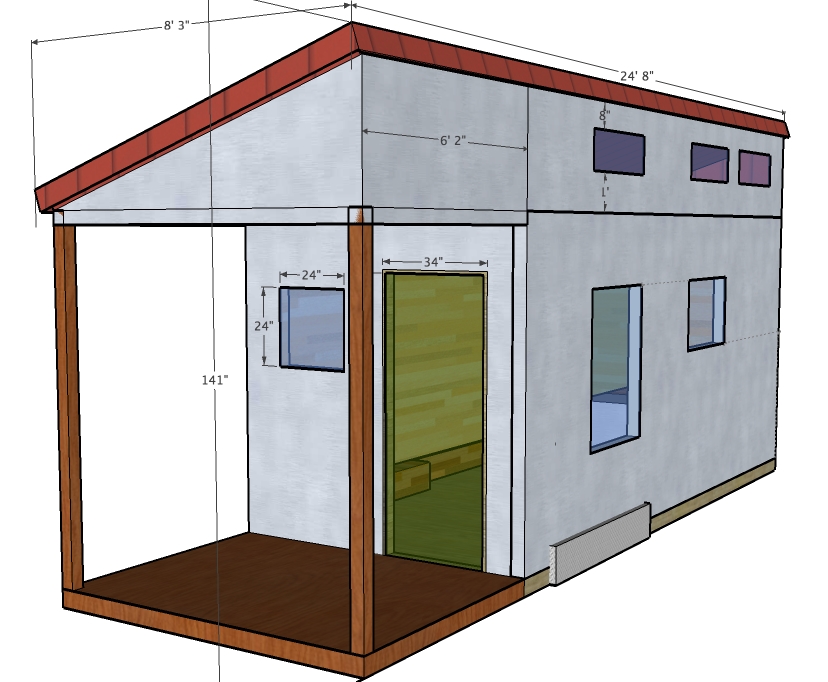
The point of not having eaves is to make the cabin easy to transport. Road travel restrictions and over sized permits come into play when exceeding 8.5′ in width. The eaves can be installed after the cabin is on location. Most customers finish out the installations with covered decks beside the cabins.
Rich,
I think your house looks very interesting, and I think the occupant is the one who provides most of the “soul.” Your “tiny home park” concept is exciting to me. I wanted to do something a bit like that with an “amusement park” site that didn’t make it in Ouray, Colorado, but it was really more of a day dream than a plan. So it’s exciting to me that yours is becoming real. Good luck!
The stair design beats the ladder design that I have seen in other tiny houses hands down. I am very interested in your house and the community that you are building.
Rich,
I love the cabin that is displayed on this page. I was wondering, could you build one with two lofts using the same stair method? It would have one loft on each end.
that wasn’t where my post was supposed to end up… I was hoping just to put it on the bottom. Is the video available elsewhere? Thank you.
I would like to email you, but can’t find an email address. Could you send me your address? I have an idea for design I’d like to run by you. Hope to hear from you. Jean
[email protected]. You can find it under About > Contact at the top of the page too.
I absolutely Love It!!!!!! It has it all!
I love this one. So many tiny houses seem to much like a small trailer, this feels more like a small condo.
Hi Rich,
We are about 2 years out from finalizing our tiny house dream. We are very interested in the Pacific Loft 399 model. Can they be customized? What is the starting price? What is the average height of the sleeping loft? Thanks in advance for answering my questions. One last, are there tours of your facility to get a feeling for the size?
Thanks again,
Jean McKay
Dear Sir,
Hope this email finds you well,
I am contacting you from Source Trading Center – Bahrain,
As I was searching the web for Prefabricated Buildings, I noticed your company’s work between the other companies, and I would like to cooperate with you in order to do what is requested.
I tried to attach a PDF File including a map for a school constructed using the Prefabricated Building but there is no space for any attachements, total quantity needed for such schools is – Qty: 20 schools
However, there are some conditions required for such classes, which are:
The wall of the classes should be sound proof in order to avoid the confusion in voices between classes.
The wall of the classes should be heat proof, in order to assist the air conditioners to cool the classes.
The floor of the classes should be sound proof, as the school may be requested to be in a two floor instead of one floor, which is something we are asking for in order to avoid the noises between the first floor classes and the ground floor ones.
For such reason, I am asking you to provide us with a quotation for the requested above, for one base school and another one for two bases school, and please make sure that for the two floor school, the construction materials used to build the ground floor are strong enough endure the first floor including the students.
Waiting your reply, in order to provide you with a copy of the map to check it
Best Regards,